ProStack Reseller Accounts offer a quick and easy way to host multiple websites in a single plan.
This article provides a quick rundown of how they work, and how to manage individual sites with them.
Concepts
Reseller accounts provide two things:
- An allocation of hosted sites (e.g. 150 on our Platinum plan). These are the number of individual cPanel accounts you can create and manage. Typically, each cPanel account would contain one website.
- A pool of resources (disk space and bandwidth) to assign to those accounts.
It is up to you, the customer, to decide how much disk space and bandwidth is assigned to each individual cPanel account (and therefore, each site). You do this using Packages.
Packages are pre-created "plans" of resources that are assigned to an account, which indicate how much disk space and bandwidth that account contains.
Your allocation of disk space and bandwidth is sometimes called a Quota.
To summarise, Accounts (containing websites), are assigned Packages, which define how much disk space and bandwidth they have access to.
cPanel vs WHM - what's the difference?
Our Reseller plans operate on a platform called cPanel.
This is a control panel designed to make it easy for you to manage reseller plans. In order to allow you to manage individual accounts separately, each account has its own set of login details, to cPanel.
You have a master set of credentials (set when you sign up with us) which allows you to access WHM.
WHM is where you create accounts, add packages, and manage things. WHM also allows you to log into each cPanel account individually.
cPanel is the control panel you can use to manage individual accounts, and therefore individual websites. This means, for example, that you can give each of your customers a set of credentials to their cPanel, whilst retaining control of all your sites via WHM.
WHM is normally accessed via port 2087, so the URL is https://<server hostname>:2087
cPanel is normally accessed via port 2083, so the URL is https://server hostname>:2083
If you don't know what your cPanel or WHM URLs are, check your Hosting Welcome email, or contact support.
Example
To demonstrate how reseller plans work, here's a quick example, using our [Bronze Reseller plan].
The Bronze plan has 10GB disk space and 100GB bandwidth, and we can create up to 25 cPanel accounts.
We might choose to create a package with 1GB disk space, and 10GB bandwidth- let's call it "PackageOne". We can only create up to 10 of these packages because we are limited by the resource pool of the Bronze reseller plan we're on.
Since we only have 10GB space, we can only create 10 packages of 1GB disk space each. The same goes for bandwidth.
If we were to create a second package, called "PackageTwo", which had 5GB disk space, and only 10GB bandwidth, we'd still only be able to create two of these- because the limiting factor here is disk space.
Things to bear in mind
The key concept with reseller accounts is that you can't over-allocate resources.
If you have a pool of 10GB of disk space, all of your accounts can only allocate 10GB in total. If you've already allocated 10GB to your sites, you won't be able to create any more accounts, even if you haven't used them all.
It's also important to bear in mind that the reseller account plan limits apply to allocated resources, regardless of how much you actually use.
If you have assigned all your disk space to one account, you won't be able to create a new account, regardless of how much space that, account is actually using.
The same is true for bandwidth, so it's important to consider how much disk space and bandwidth each site uses.
Managing your account
Reseller accounts are managed from WHM. Here's how to perform some key reseller account tasks:
Step 1 - Create a new package
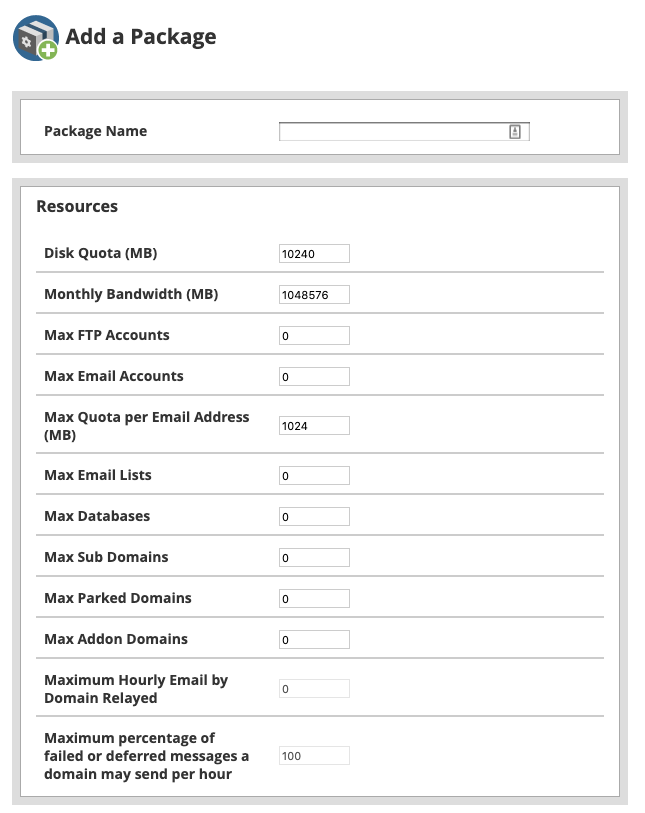
Log into WHM and click Add a Package.

From here you can set disk space and quota for the package, as well as some other options you may wish to constrain (such as email accounts).
Step 2 - Create a new account
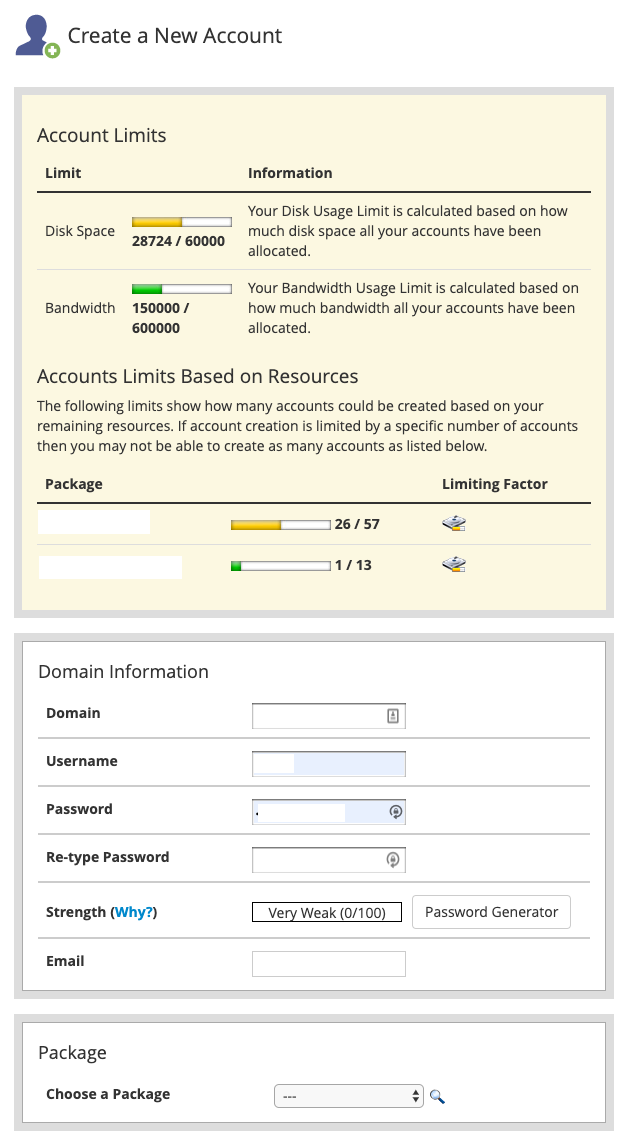
Log into WHM and click Create a new account.
Note the Account Limits box, which will indicate how much resource (disk space and bandwidth) you have in your plan, as well as how many of each package you can create (based on those resources).

This is also where you pick a package to assign to your account.
Step 3 - List existing accounts
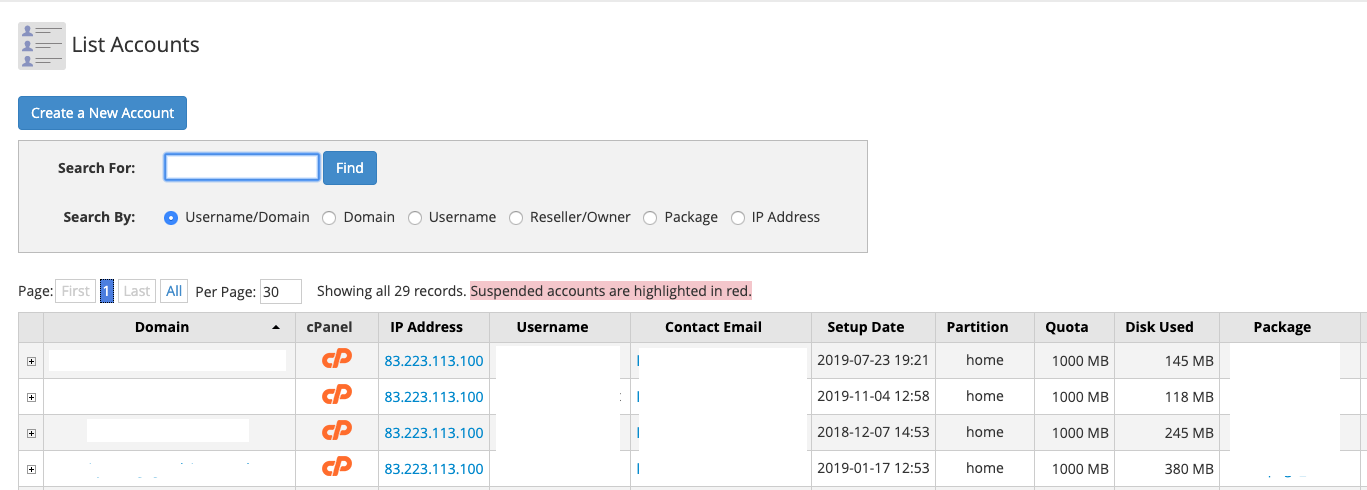
Log into WHM and select List Accounts. Here you'll see a breakdown of all your accounts, including the package they are on and the disk space they're using (Quota).
You can also use the cPanel (cP) link to log directly into cPanel for that account, without having to use the login credentials for that account.
Click the plus (+) icon to the left of each account to manage some other properties of the account, including changing the password.

Step 4 - change an account's package
Log into WHM and select Upgrade/Downgrade an Account on the sidebar menu.
This will let you choose a new package for the account.
Step 5 - Edit a Package
Log into WHM and click Edit a Package from the sidebar menu.
This lets you modify a package's disk space, bandwidth, or other features.
Need further assistance?
The official WHM documentation also contains useful information on how to use reseller account features - [WHM | cPanel & WHM Documentation]
If you need assistance with managing your reseller account, feel free to contact our support team at any time, and we'll be happy to help! Get in touch today!


